Pits Of Doom Lesson 9: Bring The Fight
In the last lesson we learned about usability and indexes, created map/coordinate classes, then wrote a script to auto-generate monsters. In this lesson we’ll add some graphics to our map editor and give both our character and our monsters a fighting chance.
Lesson Concepts
Trapped – A Fighting Chance
Here comes the fun part, programming around the complexities that come along with making an internet based game. Since Pits of Doom is multiplayer and people can login/logout at any time we need to consider this as we build our fighting scripts.
Let’s say I’m fighting an a high ability vampire with my favorite character Joe Mage. This vampire is creaming Joe Mage with it’s kiss of Death maneuver and I don’t want to loose him so I logout of the game before he dies. We’ve already established that when a player logs out of all of their characters become inactive. When I’m not playing other members can’t fight and kill my characters. However, in this case I’ve just escaped the evil vampire. When I login tomorrow (or 5 minutes later because the vampire was hungry and moved on to its next snack) I can rest Joe Mage until he’s back to 100% health and be off on my merry way….
This exit strategy will make killing monsters and other members in the game a hassle — as well as making logging in/out just as trying. Letting people escape from fights so easily would ruin Pits of Doom to the point that players would want to cast themselves to their own shadowy deaths. To fix this problem we’re going to build a trap into the fighting sequence. Once two characters engage in a fight they cannot go inactive until the fight sequence has ended. The only way a fight sequence ends is if one of the combatants dies or escapes or declines to fight.
To illustrate this let’s go back to poor, dying Joe Mage. When I logout, all of my characters become inactive EXCEPT for characters currently engaged in a fight. Even if I close the browser window the vampire can continue to pulverize Joe while he cowers in terror abandoned to his fate awaiting my next non-existent command. The next time I login I can morn the loss of my best character and divert my attentions to increasing the skills of my next most powerful Elf.
This is something we may touch on later but for now we’ll keep it in mind as we continue to program Pits Of Doom.
Duke It Out
The overall fight concept is fairly simple. The amount of damage done to the opponent is based on the character’s abilities and type of attack/maneuver they’re doing. For right now we’ll have our monster engage in the fight only if you provoke or attack it first. Later we can add functionality so the monsters can attack without being approached. For right now we update the map so that monsters appear as a blue M. If you move your character into a spot with a monster you’ll initiate a fighting sequence. This brings up the monster’s information and gives you options to fight it.
/**************
    * Purpose: attack the monster at this location
    * Precondition: the character is still alive
    * Postcondition: the monster has been attacked
    **************/
    function attack()
    {
        //make sure there is a monster at this location
        if (hasMonster($this->x, $this->y, $this->z, $this->mapid))
        {
            $monster_dead = false;
            $character_dead = false;

            //load the monster
            $monster = new monster(hasMonster($this->x, $this->y, $this->z, $this->mapid));

            //calculate the monster's attack
            $monster_attack = $monster->calculateAttack();

            //calculate this character's attack
            $character_attack = $this->calculateAttack();

            //randomly select which one hits first
            $firstblow = rand(0, 1);

            if ($firstblow) //the character attacks first
            {
                $monster->setHealth($monster->health -= $character_attack);

                //if the monster is dead
                if ($monster->health <= 0)
                {
                    //remove the monster from the game
                    $monster_dead = true;
                    $monster->death();
                }
            }
            else //the monster attacks first
            {
                $this->health -= $monster_attack;

                //if the character has died
                if ($this->health <= 0)
                {
                    //restore their health for right now, later we can change this
                    $this->health = 100;
                    $character_dead = true;

                    //move the character to a new level and x,y coordinates
                    $this->x = startPositionX($this->mapid, $this->z);
                    $this->y = startPositionY($this->mapid, $this->y);
                    $this->database->update($this->table, "x=$this->x, y=$this->y", $this->where);

                    //eventually we'll remove the character as well but for right now they can stay
                    return "You took $monster_attack damage and died. You have been restored to full health and re-spawned at a new location.";
                }

            }

            //both the character and the monster are still alive, now we land the second blow
            if (!$character_dead && !$monster_dead)
            {
                if ($firstblow) //the character struck first now it's the monsters turn
                {
                    $this->health -= $monster_attack;

                    //if the character has died
                    if ($this->health <= 0)
                    {

                        //restore their health for right now, later we can change this
                        $character_dead = true;
                        $this->health = 100;

                        //move the character to a new level and x,y coordinates
                        $this->x = startPositionX($this->mapid, $this->z);
                        $this->y = startPositionY($this->mapid, $this->y);
                        $this->database->update($this->table, "x=$this->x, y=$this->y", $this->where);

                        //eventually we'll remove the character as well but for right now they can stay
                        return "You took $monster_attack damage and died. You have been restored to full health and re-spawned at a new location.";
                    }

                }
                else //the monster struck first, now it's the character's turn
                {
                    $monster->setHealth($monster->health -= $character_attack);

                    //if the monster is dead
                    if ($monster->health <= 0)
                    {
                        //remove the monster from the game
                        $monster_dead = true;
                        $monster->death();

                    }
                }
            }

            //if the character is dead put their health back to 100 for right now
            //later on we'll make them create a new character if one dies
            if ($character_dead)
            {
                $this->health = 100;

                //move the character to a new level and x,y coordinates
                $this->x = startPositionX($this->mapid, $this->z);
                $this->y = startPositionY($this->mapid, $this->y);
                $this->database->update($this->table, "x=$this->x, y=$this->y", $this->where);

                return "You took $monster_attack damage and died. You have been restored to full health and re-spawned at a new location.";

            }
            else
            {
                if ($monster_dead)
                    return successMsg("You killed the monster");
                else
                    return successMsg("You caused  " . number_format($character_attack) . " damage");
            }

            //update the character's health
            $this->database->update($this->table, "health=$this->health", $this->where);

        }
        else
            return errorMsg("You flail your weapon about but there's no monster to attack");
    }

    /**************
    * Purpose: generate a number for how much attack damage this monster can cause
    * Precondition: none
    * Postcondition: returns attack damage value
    **************/
    function calculateAttack()
    {
        if ($this->fightlvl > 1)
            return rand(($this->speed + $this->intelligence + $this->strength + $this->agility)/($this->fightlvl/.5), ($this->speed + $this->intelligence + $this->strength + $this->agility)/($this->fightlvl/1.5));
        else
            return rand(($this->speed + $this->intelligence + $this->strength + $this->agility)/4, ($this->speed + $this->intelligence + $this->strength + $this->agility)/5);

    }
A Picture Says It All
Many people overlook aesthetics. We could probably argue back and forth over how much they really matter in the long run, but on some level a picture says a thousand words. For that reason we’re updating our map with pictures. Say goodbye to the ugly letters on our screen.
To do this we’re going to create a sprite library. The sprite library requires you have a version of PHP with GD enabled. GD is a graphics library for PHP. It allows you to edit, color, crop and create images dynamically in PHP. If you don’t have GD installed that’s okay I’m going to include an option to turn sprites off.
I’ve found a free sprite sheet on the internet. The owner says it’s available under a GNU license but if you want to be 100% sure your safest bet is to use your own. You may not be an artist so check out deviantart.com and after browsing for a bit you can probably find someone who’d be willing to help you for a commission.
Graphics Libraries
No, I’m not talking about a stuffy old building with a bunch of books inside. In programming a library is a set of classes and code that can be easily reused and aids in the development of a larger piece of software. While we may develop this sprite library for Pits of Doom we should be able to easily use it on other games in the future with minimal effort. In order to get started we’ll make a small modification to our maps table. We need to know the width and height of the tiles, along with the sprite sheet we’ll be using.
mysql > ALTER TABLE map
    ADD tile_width int(1) NOT NULL,
    ADD tile_height int(1) NOT NULL,
    ADD tile_offset int(1) NOT NULL,
    ADD tile_row_count int(1) NOT NULL,
    ADD tile_sheet varchar(50) NOT NULL;
Tile width and height will hold the size of the tiles on our sprite sheet. Tile offset will be used to calculate the distance to the next tile if there’s a gap between them. Finally, tile row count will tell our tile library how many images are in each row on our sprite sheet.
Now that our map can hold the proper tile information we need to add two fields to our map data table to store the sprite image coordinates.
mysql> ALTER TABLE mapdata
       ADD tile_x int(1) NOT NULL,
       ADD tile_y int(1) NOT NULL;
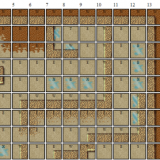
Now I know this all may be a bit confusing so here’s a little diagram to help. The white numbers in the center are the tile’s X and Y coordinates that we’ll be storing in the mapdata table. The spaces between each column are the xoffset and the spaces between each row are the yoffset. The xoffset moves across the image and the yoffset moves down. The row count is the number of tiles that go across each row, in this example we have 3.
 Using GD we’re going to plit apart the tiles in this sprite sheet and load them into our game. This way instead of uploading and managing thousands of smaller images we only have to deal with one large sprite sheet. In addition this allows us to quickly and easily replace all the tiles in a map just by switching the tilesheet image.
If we don’t update our map editor in the process it’s going to be a long and frustrating process trying to get the different tiles to match up exactly where we want them to on our map. So we’re going to add the fields we put on our map table to our map editor.
On the map page we’re going to create a drop down box with all of the available sprite sheets so you can pick the one you want to use by name. This is really useful if you have several sprite sheets that you’re using, say one for each level of the game. To populate the drop down box create a new function called getSpriteTiles that returns an array of the file names in our images/tiles directory. It will look similar to the getDirectoryContent function we used in the view source utility. What we pass as the value of $root needs to be the location of our tile sheets. In our case I’ve created a new folder called tiles in the images folder.
/****************
* Purpose: get an array of the sprite sheets names
* Precondition: $root must be the relative path to the folder with the sprite tile sheets
* Postcondition: an array with the tile sheet names is returned
*****************/
function getTileSheets($root)
{
	$array = scandir($root); //get all the files and directories
        $result = array(); //the list of file names we're building

	//loop through everything we found in that directory
	foreach ($array as $key => $name)
	{
		//if the result is a file name then we add it to our $result array
		if (is_file($root . $name) || is_file($root . "/" . $name))
			array_push($result, $name); //add the name to the array
	}

        //return whatever names we found
	return $result;
}
Using PHP’s GD Library
GD is a PHP library which allows you to create, edit and update images using PHP. It’s been known to have some memory leaks however it also comes standard with most newer installations of PHP so I figure more people will have it already on their server. If you don’t have access to GD you’ll have to use the old map editor or you can contact your hosting provider and see if they provide something similar like ImageMagik or would be willing to install GD for you.
One of the neatest things about <img> tags in HTML is that people don’t realize you can put things other than urls with image extensions (.jpg, .png, .gif). The image tag only needs a source, or data that is formatted to display as an image. What this means is we set our <img> tag to load a PHP file as long as that PHP file returns image data. Therefore our image tag will look something like this:
<img src="images/tile.php?x=0&y=0" />
This tells our image tag to look for the file called tile.php in our images folder. Then we pass it an X and Y coordinate so we know which tile we want to load. In our tile.php file we can use $_GET to retrieve the X and Y coordinates and use that to pull up our tilesheet and basically “copy” a small portion out of our larger image. When we’ve done that we display the results and our <img> tag will display our “copied” image.
    function displayTile($x, $y)
    {
        $x = mysql_real_escape_string($x);
        $y = mysql_real_escape_string($y);

        if (!is_numeric($x) || !is_numeric($y) || !$this->tile_width || !$this->tile_height)
            return;

        $dest = imagecreatetruecolor($this->tile_width, $this->tile_height);

        $tilex = ($x * $this->tile_width) + (($x+1) * $this->xoffset);
        $tiley = ($y * $this->tile_height) + (($y+1) * $this->yoffset);

        switch ($this->getExtension())
        {
            case "bmp":
                    header('Content-type: image/vnd.wap.wbmp');
                    $src = imagecreatefromwbmp($this->image);
                    imagecopy($dest, $src, 0, 0, $tilex, $tiley, $this->tile_width, $this->tile_height);
                    imagewbmp($dest);
                    imagedestroy($dest);
                break;
            case "gif":
                    header('content-type: image/gif');
                    $src = imagecreatefromgif($this->image);
                    imagecopy($dest, $src, 0, 0, $tilex, $tiley, $this->tile_width, $this->tile_height);
                    imagegif($dest);
                    imagedestroy($dest);
                break;
            case "jpg":
            case "jpeg":
                    header('content-type: image/jpeg');
                    $src = imagecreatefromjpeg($this->image);
                    imagecopy($dest, $src, 0, 0, $tilex, $tiley, $this->tile_width, $this->tile_height);
                    imagejpeg($dest);
                    imagedestroy($dest);
                break;
            case "png":
                    header('Content-type: image/png');
                    $src = imagecreatefrompng($this->image);
                    imagecopy($dest, $src, 0, 0, $tilex, $tiley, $this->tile_width, $this->tile_height);
                    imagepng($dest);
                    imagedestroy($dest);
                break;
            default: return;
                break;
        }
    }

    function getExtension()
    {
        return substr($this->image, strrpos($this->image, ".")+1, strlen($this->image) - strrpos($this->image, "."));
    }
New “Visual” Map Editor
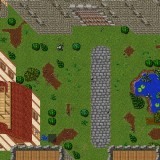
I’ve gone ahead and spruced up the map editor a bit with a Javascript library called jQuery. Since that’s outside of the scope of this tutorial I’m not going to talk about the code but I will talk about the new functionality. In our new map editor once you’ve selected a tile sheet the map editor fetches the image, breaks it apart using GD, then I use javascript to display each of the individual images on the page. In addition I’ve added a drop down box of all the available tiles so you can select a square on the grid then choose which image to put into that map position in addition to the type (wall, empty space, pit, treasure, starting spot).
There are three sections on our new map editor. To the left side of the page you can create a new map just like we were doing before. Now to the right hand side there are two section. The top section allows you to pick a map and enter the level you want to edit. The lower section lets you select a tile sheet and apply it to the map. Right now I only have one tile sheet in there but you can easily add more to your map editor by dropping the files into the images/tiles folder. Here’s a look at our new map editor:
Summary
Try the working version! In this lesson we added fighting, built a simple sprite library and updated our map and map editor with pictures loaded dynamically from a tile sheet. Our little game has come a long way from simply pressing a button to see if you’ve found the treasure or not.
Game Files
Working Version:
Pits of Doom, use the login below, sign up and create your own account or take our new map editor out for a spin.
Login: test
Password: test
Source Files: View & Download
Download the .zip file for this lesson.
Use the view the source utility to look at the code.
Lesson Reasoning
We’ve finally put some fight into the game. Monsters are displayed on the board which no longer looks like a strange mash of letters. We can die, be re-spawned and fight monsters. If we really wanted to we could almost call our little game complete because all of the core mechanics are now in place — but our game is still lacking! Even though you can move your character, move from map to map as you go up and down levels, and fight monsters there’s still something missing.
Running around killing monsters would be completely boring and repetitive. It’s time to add some real interaction. In the next lesson we’ll have the map display other characters that are online and implement our chat room.


