Lesson 6: Pits of Doom — MySQL Database Class
In the last lesson I introduced you to functions, reading & writing to a file, some simple javascript and adding features to the game so we could swap in/out maps and move up/down map levels. Now this is all fine and dandy, but we live in the age of databases so it’s time to pull out your thinking caps. Let’s get busy converting everything we’ve done so far to a database.
Lesson Concepts
MySQL Basics
There are several big database software companies out there but I’m a particular fan on MySQL (especially since it’s free…). SQL is a standardized query language that’s not so standard. Most of the basic operations and ideas are available in the different kinds of database software but not all of them. All the SQL here will is put together assuming your using MySQL 4.0 or later.
So, what is a database? If you think you’ve never used a database before you’re wrong. Are you online right now reading this post?? Guess what, you’re reading information from a database. You can be almost 90% certain most any big website you visit they use a database for their online content.
What to compare it to? If you’ve ever used Microsoft Excel or Microsoft Access you have a step up in the basics I’m going to teach you. So, here it is.
Terminology – Database, Tables, Rows, Columns & Keys
A lot of people get confused with some of these terms so I’m going to go over them before I start officially using them.
Database – this can refer to two things. People often use it to refer to the database software (MySQL, Oracle) but it also refers to a repository, or large collection of data that consists of several tables. When I use the term database I am referring to the large collection of data, not to the actual software. If I want to refer to the software, I’ll call it by it’s name: MySQL. Think of a database as a workbook in Excel, where it contains multiple spreadsheets yet they’re all a part of the same file.
Table – a database consists of many tables. Tables help you gather similar data together, form relationships, and setup constraints/limits to the data you insert into it. In this lesson we’ll be creating and working with several tables that make up all of our map data. Think of tables as a single spreadsheet in excel.
Row – a row is a horizontal line of data in a table.
Column – a column is a vertical line of data in a table.
Keys – in SQL things are identified by keys. Think of a key as a way to distinguish one record from another. In the United States everyone has a unique social security number, that way the government can distinguish one John Smith from another. Sometimes keys can be made up of multiple things. For instance, if you knew one John Smith lived in Florida and the other lived in New Jersey you’d be able to tell the two apart. Keys can work the same way. Falling back on my earlier excel references, think of a Key as one of the column or row headers on the spreadsheet file (A-Z at across the top and down the side).
Creating A Database
For the sake of learning I’m going to walk you through some basic SQL before I introduce combine PHP into the mix. The first thing we need to do is make a database for Pits of Doom. To help you distinquish between when I’m writing SQL code versus PHP code I’m going to precede all my SQL statements with mysql> like you’d see the mysql command prompt screen.
mysql> CREATE DATABASE pitsofdoom
A lot less painful looking thing you thought it would be huh? Most people have a general rule with SQL where they capitalize SQL command words and put their own text in lowercase letters. I believe in some database software the capitalization is required, but it’s not required for MySQL. Choose whichever way you prefer.
Creating A Table
This is nearly as easy as creating a database with a few exceptions. When we create a table we have to give it all the row values we’ll be using and a type for each of those values. However, before we do that we’ll need to think about the design of these tables, the game map tables.
Let’s think about it this way:
Each map has 1 name and multiple levels — we’ll need to know what’s the deepest level you can go in each map.
Each map has lots of data for each level — it’s probably a good idea to separate this data from the map name and level data because there’s so much of it. Also, since we have so much map data we don’t want to repeat things like the map name over and over again (we don’t really need to know the map name more then once)
So, the maps in our game should have at least two tables. One table with the map name and level, the other table with all the data for that particular map. If we draw out a rough sketch of our tables they’d look like this:
Table Name: Map
Fields:
ID: a unique number for this map (number)
Name: the name of this map (string)
MaxDepth: the maximum depth level for this map (number)
Table Name: MapData
Fields:
Id: a unique number for this map data information (number)
MapId: the id of the map this data belongs to (number)
X: the x coordinate for this map value (number)
Y: the y coordinate for this map value (number)
Z: the depth of this place on the map (number)
Value: the value of the field in the map ie X, T, W, E (single character)
Now that we have our tables laid out we’ll convert them into SQL.
mysql> CREATE TABLE map ( Â id integer NOT NULL AUTO_INCREMENT, Â name varchar(100) NOT NULL, Â maxdepth integer NOT NULL, Â UNIQUE KEY(id))
In this first table we’ve created our map information. We’ve set it up so the ID number must be unique, and so that it’ll automatically increment for us as we add records (so we don’t have to do that ourselves!). You’ll notice anything we wanted to put a number into has a type of INTEGER. Anything we wanted to put text into has the type of VARCHAR and then we specified the maximum number of characters for that field. So in this case the name of our map can’t be more then 100 character’s long.
A visual representation of the table we made would look something like this:
| ID | Name | MaxDepth |
These three fields combined make up our map table. Now let’s make our map data table:
mysql> CREATE TABLE mapdata ( Â id integer NOT NULL AUTO_INCREMENT, Â mapid integer NOT NULL, Â x integer NOT NULL, Â y integer NOT NULL, Â z integer NOT NULL, Â value varchar(1), Â UNIQUE KEY(id))
Visually, this would look something like this:
| ID | MapID | X | Y | Z | Value |
All of these fields combined make up the mapdata table. However, our tables need a lot more information then just the columns for the data we’re going to add. Let’s see what it would look like visually if we added some information from the map we made for Round Hill.
| ID | Name | MaxDepth |
| 1 | Round Hill | 5 |
The first map in our game starts out with the ID number 1. If you remember, we setup our map table to auto-increment the ID field. That means it will always add 1 to the value of the ID number. The max depth of the first entry in our table is 5 because there are five levels in our map. Now let’s see what our map data table would look like with some of the first level’s information inserted into it:
| ID | MapID | X | Y | Z | Value |
| 1 | 1 | 0 | 0 | 1 | W |
| 2 | 1 | 0 | 1 | 1 | W |
| 3 | 1 | 0 | 2 | 1 | W |
| 4 | 1 | 0 | 4 | 1 | W |
| 5 | 1 | 0 | 5 | 1 | W |
| 6 | 1 | 0 | 6 | 1 | W |
| 7 | 1 | 0 | 0 | 7 | W |
| 8 | 1 | 0 | 8 | 1 | W |
| 9 | 1 | 0 | 9 | 1 | W |
| 10 | 1 | 0 | 10 | 1 | W |
| 11 | 1 | 0 | 11 | 1 | W |
| 12 | 1 | 0 | 12 | 1 | W |
| 13 | 1 | 0 | 13 | 1 | W |
| 14 | 1 | 0 | 14 | 1 | W |
| 15 | 1 | 1 | 15 | 1 | W |
| 16 | 1 | 1 | 0 | 1 | W |
| 17 | 1 | 1 | 1 | 1 | X |
| 18 | 1 | 1 | 2 | 1 | X |
| 19 | 1 | 1 | 3 | 1 | E |
| 20 | 1 | 1 | 4 | 1 | E |
| 21 | 1 | 1 | 5 | 1 | E |
| 22 | 1 | 1 | 6 | 1 | E |
| 23 | 1 | 1 | 7 | 1 | W |
| 24 | 1 | 1 | 8 | 1 | T |
| 25 | 1 | 1 | 9 | 1 | E |
| 26 | 1 | 1 | 10 | 1 | W |
| 27 | 1 | 1 | 11 | 1 | E |
| 28 | 1 | 1 | 12 | 1 | E |
| 29 | 1 | 1 | 13 | 1 | E |
| 30 | 1 | 1 | 14 | 1 | W |
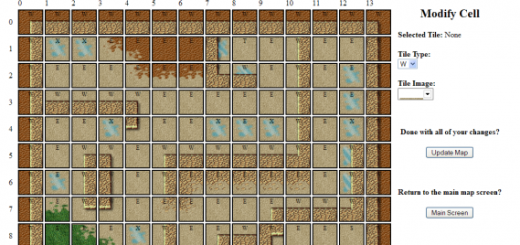
Does any of this look familiar? It should! This is the information from the first level of the map for Round Hill. It’s actually the first two top rows in the map file we exported. This brings us to our next topic, how in the heck do you add this information to the database using MySQL?
Inserting Values Into A Table
First, let’s try to insert the map information for Round Hill into our map table:
mysql > INSERT INTO map (name, maxdepth) VALUES ('Round Hill', '5')
The insert statement in SQL is comprised of the table you want to insert into, the fields you’re inserting data into, and then the data. The sequence of the data should match the order of the column names you put in. So if we reversed our values to ‘5’, ‘Round Hill’ we’d end up with an error when we tried to insert the text value Round Hill into a number value.
Now let’s insert some of our map information into the mapdata table.
mysql > INSERT INTO mapdata (mapid, x, y, z, value) VALUES ('1', '0', '0', '1', 'W'),

         ('1', '0', '1', '1', 'W'), ('1', '0', '2', '1', 'W')
In this case, I’ve actually inserted three rows using one insert statement. Each entry is surrounded by parenthesis. When you insert something, you can use either of these formats, whichever works best for you.
Selecting Values From A Table
Once you have data in a table of your database you’re ready to start working with it. Let’s pretend we a table called members with the following data in it:
| ID | Name | Username | Password | Show_Email | |
| 1 | Jade Krafsig | JadenDreamer | ilovehorses | jade@design1online.com | Y |
| 2 | John Doe | Jdoe | imadope | jdoe@gmail.com | N |
| 3 | Jane Doe | Jdoe | howdy | jane.doe@gmail.com | N |
We have three members in our database. Let’s pretend John Doe is trying to login using his email address and password. Before we can let him access any member’s only area we need to verify that this username and password are correct, then figure out what his show email status is.
mysql > SELECT id, name, show_email FROM members WHERE email='jdoe@gmail.com' AND password='imadope'
The select statement is broken into several parts, only a few of the basics which I’m going to show you right now. After the word SELECT, you list the name of the columns you want to view. After the word FROM you list the name of the table. The WHERE section is pretty self explanatory. If we ran this query we would get back the following table:
| ID | Name | Show_Email |
| 2 | John Doe | N |
One thing to notice right off the bat, when we select something we always get back a TABLE. That means we can get more then one row of data from a select statement. For instance, take this query:
mysql > SELECT * FROM members WHERE username='Jdoe'
| ID | Name | Username | Password | Show_Email | |
| 2 | John Doe | Jdoe | imadope | jdoe@gmail.com | N |
| 3 | Jane Doe | Jdoe | howdy | jane.doe@gmail.com | N |
In this example, we used an asterisk to tell MySQL we want all the column fields in the table where members have a username that equals Jdoe. Now you have multiple records returned. Take a look at some of the queries below, can you figure out what table would be generated if you ran them?
mysql > SELECT id FROM members WHERE show_email='N'mysql > SELECT * FROM members WHERE email='jane.doe@gmail.com' OR email='jdoe@gmail.com'

mysql > SELECT * FROM members WHERE 1=1

mysql > SELECT * FROM members

mysql > SELECT username, password FROM members WHERE username != password

mysql > SELECT * FROM members WHERE id >= 2
Think you’ve figured them out? Good! Let’s go over them. The first one finds all members who have the show_email field set to N. The second one selects all columns where the email address is one value OR where the email address is another value. The third query will select everything in the entire database, as will the query after it. The next query shows all the usernames and passwords where the username field and the password field don’t have the same values in them, and the last query finds all members with an ID greater than or equal to the number 2.
Updating Values In A Table
Data doesn’t usually stay static, especially data for a multiplayer online game. People change passwords, write messages, go on quests, and more. In order for the game to reflect that we’ll need to update the data as people play. That’s were update statements come in. Let’s use the same members table we had before. Pretend that John Doe has logged into his account and wants to change his email address:
mysql > UPDATE members SET email='john.doe@gmail.com'
If you realized immediately that this will cause a problem you’ve got the right mindset. If you didn’t notice an error right away look again. Computers are really dumb, they do exactly what you tell them to. If you ran this query, you would change everyone’s password in the game to John Doe’s new email address. What a disaster!
This is where keys become important. In order to identify which record in our database belongs to John and only change data for information that belongs to John we can use the key for our member’s table: ID.
mysql > UPDATE members SET email='john.doe@gmail.com' WHERE id='2'
When we run this query only the email address for John is affected. Perfect!
Update statements can be as easy and as complicated as you want. We could update every other row by figuring out if the id number was odd or even, we could change passwords according to the show_email field, and more. However you have to be careful with update statements. What happens if we did this:
mysql > UPDATE members SET password='heya', email='john.doe@gmail.com' WHERE username='jdoe'
Now we run into the problem of changing multiple records again. In our members table both John and Jane Doe use the same username. If we ran this query, we’d reset both of their passwords to heya and both their email addresses to john.doe@gmail.com.
Take a look at some of these other update queries. Can you figure out what they’d do?
mysql > UPDATE members SET password='test' WHERE id <= 1
mysql > UPDATE members SET username='Jade2', password='newpass' WHERE email='jade@design1online.com' AND username='John'

mysql > UPDATE members SET showing_emails='Y'
The first query sets all member’s passwords to test if their ID number is less than 1. The second query sets both the username and password for all members whose email matches AND have the username John. The third and final query fails, there is no column called showing_emails. If it instead said show_email it would set everyone’s show_email value to Y.
Deleting Values From A Table
Taking things out of your database is sometimes almost as important as putting things in. I run pretty small servers with a lot of active people who play. In order to make queries faster I delete old data. There are other reasons to delete data as well and I’m sure you can think of a few.
So you know, there is no way to delete a certain field in one file. Deletion in mysql is an all or nothing, it either removes the whole row or it doesn’t.
mysql > DELETE FROM members WHERE id='3'
This removes Jane Doe from the members database. Again, you can end up with the same problems deleting as you did updating. Pay careful attention to any delete statement so you don’t delete everything in your database!
MySQL & PHP Working Together
In order to access our database information from mysql in our php files we have to open a connection to the database. I usually make this a file called dbconnect.php and include it at the top of every page I need database access to. Your file will vary based on the username, password, and name of the database you’re using so you’ll need to change this file to work for you:
<?php
/************
* File: dbconnect.php
* Purpose: open database connection
*************/
//open our database connection with the correct username & password
mysql_connect(“localhost”, “USERNAME_HERE”, “PASSWORD_HERE”)
or die(“could not connect to the database because: ” . mysql_error());
//change to the database we want to use
mysql_select_db(“DATABASE_NAME_HERE”)
or die (‘could not switch to using database because: ” . mysql_error());
?>
The first function mysql_connect starts the connection to the database. If you’re using a database that’s local to where you host your website then the words localhost will never change. The or die statement at the end of the function is a great way to help you debug your mysql/php code. If something goes wrong while mysql is trying to connect it’ll automatically give you a fairly descriptive error message about the problem.
The second function mysql_select_db switches to the database you’ll be using. Often times you have multiple databases on the same server. For instance, I have two servers. On each server I have anywhere from 2-15 databases. When I run a PHP script, it needs to know which of those databases I’m using before it can try to access any of my tables.
Now you’ve seen two of the great functions PHP has built in to make it easy working with MySQL. Since we can connect to our database let’s start performing operations on it.
<?php
include(‘dbconnect.php’);
//we start off by setting the result of our query to a variable named $result
$result = mysql_query(“SELECT id, name FROM members WHERE id=’1′”)
or die (‘cannot select the member id because: ‘ . mysql_error());
//now we need particular information from that result put into our $row variable
$row = mysql_fetch_assoc($result);
//now we can access the values in our $row variable using the name of the field we want
echo “Hello ” . $row[‘name’] . “! Your member ID number is: ” . $row[‘id’];
?>
This prints, Hello Jade! Your member ID number is: 1
I’m not sure about you but I think that’s totally awesome. But in this example we need to know someone’s ID number before we display information about them. What happens if we want to change that based on a number someone’s entered into a text field? Take a look at this next example:
<?php
include(‘dbconnect.php’);
if ($_POST[‘id’]) //they’ve entered an ID number into the box
{
$id = $_POST[‘id’]; //set this variable to what they entered
$result = mysql_query(“SELECT id, name FROM members WHERE id=’$id'”)
or die (‘cannot select the member id because: ‘ . mysql_error());
//now we need particular information from that result put into our $row variable
$row = mysql_fetch_assoc($result);
//now we can access the values in our $row variable using the name of the field we want
echo “Hello ” . $row[‘name’] . “! Your member ID number is: ” . $row[‘id’];
}
?>
<form action=”#” method=”post”>
Enter an ID number: <input type=”text” name=”id” value=”<?php echo $_POST[‘id’]; ?>” />
<center><input type=”submit” name=”submit” value=”Click Me!” /></center>
</form>
In this example our page now pulls the correct information about whichever member’s ID number you enter. Now this works fine if someone uses a number and its less then 4, but what happens if they enter something else? Can you fix this so it only displays information about the member if the number is valid? Here’s two hints, you can use the function isNumeric($number) to find out if what someone entered is a number, then you should can check to see if the value returned by $row[‘field_name’] has data in it.
Let’s display a list of all of our members. How do we do that? Take a look at this code:
<?php
include(‘dbconnect.php’);
//I always change this variable to loop so it’s easier to read
$loop = mysql_query(“SELECT id, name FROM members WHERE id=’$id'”)
or die (‘cannot select the member id because: ‘ . mysql_error());
//now we want all the information that $row finds, not just the top value
while ($row = mysql_fetch_assoc($loop))
{
echo “Member ID: ” . $row[‘id’] . ” – ” . $row[‘name’] . “<br/>”;
}
?>
This goes through and echo’s the ID number and name of every member in our database as long as $row has a value. That means as soon as we no longer have any results returned from our table the loop will stop automatically.
There’s one more thing you need to know before we go on to making an SQL class, and that’s how to update a row.
<?php
include(‘dbconnect.php’);
if ($_POST[‘password’])
{
//notice how we don’t set this equal to a variable now
mysql_query(“UPDATE members SET password='” . $_POST[‘password’] . “‘ WHERE id=’1′”)
or die (‘cannot select the member id because: ‘ . mysql_error());
echo “You updated the password for Jade!”;
}
?>
<form action=”#” method=”post”>
Enter an ID number: <input type=”text” name=”password” />
<center><input type=”submit” name=”submit” value=”Update Jade’s Password!” /></center>
</form>
In this example we have only one major difference. With the mysql update or delete statement, you don’t need a variable in front of it. Either the update works, or fails. Either a delete works or fails. There’s nothing to store for later use.
Whooo!! Now we’re ready to combine the two skill sets for our game. Instead of writing tons of queries all over the place we’re going to create a SQL class to help us out. It’ll do a ton of the work for us so we can focus on the bigger picture.
Class Basics
A class is a good way to abstract lots of smaller details from a bigger picture. We’re going to create a simple vending machine class. Everyone has used a vending machine before so it’s a great example.
There are lots of different parts that make up a vending machine, but all combined together we only think of the vending machine as one object. A class uses the same kind of idea, lots of smaller parts making a bigger object. Let’s think about fruit:
Fruit Class
Multiple Types of Fruit
But all have common characteristics:
Name
Color
Size (small, medium, large, and extra-large)
Sweet (yes or no)
We can take several actions with fruit:
Wash
Eat
Shine
Take over the world — just kidding
Using this really simple break down, let’s make a fruit class:
<?php
class fruit
{
//class variables, these are variables
//that belong specifically to this class
var $name;
var $color;
var $size;
var $sweet;
var $clean;
var $washed;
function fruit($name)
{
//this is a class constructor. It always has the same name
//as the class and the same parameters. Whenever we
//make a fruit class this is called automatically
$this->name = $name; //we automatically give this fruit its name
$this->clean = False; //our fruit always needs to be washed first
$this->washed = 0; //we haven’t washed it any times yet
}
//but we want to be able to set other things about the fruit
function setColor($color)
{
$this->color = $color;
}
function setSize($size)
{
$this->size = $size;
}
function setSweet($sweet)
{
$this->sweet = $sweet;
}
//lets make a way to wash our fruit
function wash()
{
$this->clean = True; //our fruit is clean now
$this->washed++; //we’ve washed our fruit one more time
}
//we want to eat our fruit now
function eat()
{
if (!$this->clean)
echo “You should always wash your $this->color $this->name first!!! “;
if ($this->clean && $this->washed < 2)
echo “You’re eating a dull looking piece of $this->name… “;
if ($this->clean && $this->washed >= 2)
echo “You’re eating a shiny piece of $this->color $this->name! “;
if (!$this->clean && $this->washed >= 2)
echo “Your $this->name is shiny but you probably should wash it first. “
if ($this->sweet)
echo “This fruit is sweet.”;
else
echo “This fruit is classified as a vegetable!”;
}
//we can make a shine function, that washes the surface of the fruit as well
function shine()
{
$this->washed++;
}
} //end of our class
//now that we have our class, let’s make some fruit!!
$orange = new fruit(“Orange”);
$orange->setSize(“small”);
$orange->setColor(“orange”);
$orange->setSweet(True);
$fruit = new fruit(“Watermelon”);
$fruit->setSize(“large”);
$fruit->setColor(“green”);
$fruit->setSweet(True);
$veggie = new fruit(“Tomato”);
$veggie->setSize(“medium”);
$veggie->setColor(“red”);
$veggie->setSweet(False);
echo “Washing my $orange->name. “;
$orange->wash();
echo “<br>Eating my $veggie->size $veggie->name. “;
$veggie->eat();
echo “<br/>Washing my $orange->name again. “;
$orange->wash();
echo “<br/>Shining my $fruit->size $fruit->name. “;
$fruit->shine();
echo “<br/>Eating my $fruit->name. “;
$fruit->eat();
echo “<br/>Eating my $orange->size $orange->name. “;
$orange->eat();
?>
Try running this script. What happens? One of the neatest things about a class is that all of the functions you make inside of a class can be applied to any object of that class. In the example above we had three different fruit objects. Even though they were all different variables they all used the same functions of the fruit class in a different way. You’ll also notice we can access the variables we made in the class using the -> arrow. Try adding more functions to this class. Try making $veggie = $fruit. What happens when you do $veggie->name now? Try adding a function to the class that lets you set all properties (color, sweet, size) at the same time.
Creating A MySQL Class
So, here goes nothing:
<?php

/**************

* File: mysqlobj.php

* Purpose: database class

**************/class database

{

    //variables for this class

    var $database;

    var $host;

    var $username;

    var $password;

    var $classerror;

    var $connected;

/**************

    * Purpose: default constructor, is called every time we create an object of this class

    * Precondition: host, username & password for the database, database we're using

    **************/

    function database($host, $username, $password, $database)

    {

        if (!$username)

            return errorMsg("You must enter a username");

if ($username != "root" && !$password)

            return errorMsg("You must enter a password");

if (!$database)

            return errorMsg("You must enter a database");

if (!$host)

            $this->host = "localhost";

        else

            $this->host = $host;

$this->username = $username;

        $this->password = $password;

        $this->database = $database;

        $this->classerror = "Database Error: ";

//automatically connect to the database

        $this->connect();

    }

/**************

    * Purpose: connect to the database

    * Precondition: none

    * Postcondition: connected to the database

    **************/

    function connect()

    {

        mysql_connect($this->host, $this->username, $this->password)

        or die ($this->classerror . mysql_error());

mysql_select_db($this->database)

        or die ($this->classerror . mysql_error());

$this->connected = true;

    }

/**************

    * Purpose: end connection to the database

    * Precondition: none

    * Postcondition: close database connection

    **************/

    function disconnect()

    {

        mysql_close();

        $this->connected = false;

    }

/**************

    * Purpose: check for connected to database

    * Precondition: none

    * Postcondition: connected to the database

    **************/

    function checkconnection()

    {

        if (!$this->connected)

            $this->connect();

    }

/**************

    * Purpose: query the database

    * Precondition: query to run

    * Postcondition: returns query data

    **************/

    function query($sql)

    {

        if (!$sql)

            return errorMsg("You must enter a query");

$this->checkconnection();

$result = mysql_query($sql)

        or die ($this->classerror . mysql_error());

return $result;

    }

/**************

    * Purpose: selection query

    * Precondition: fields, table, where

    * Postcondition: returns query data

    **************/

    function select($fields, $table, $where)

    {

        if (!$fields)

            return errorMsg("You must enter a field");

if (!$table)

            return errorMsg("You must enter a table");

$this->checkconnection();

$result = mysql_query("SELECT $fields FROM $table $where")

        or die ($this->classerror . mysql_error());

$row = mysql_fetch_assoc($result);

        return $row;

    }

/**************

    * Purpose: update query

    * Precondition: table, fields, where

    * Postcondition: field has been updated

    **************/

    function update($table, $fields, $where)

    {

        if (!$fields)

            return errorMsg("You must enter a field");

if (!$table)

            return errorMsg("You must enter a table");

$this->checkconnection();

mysql_query("UPDATE $table SET $fields $where")

        or die ($this->classerror . mysql_error());

    }

/**************

    * Purpose: delete query

    * Precondition: table, where

    * Postcondition: row in table has been deleted

    **************/

    function delete($table, $where)

    {

        if (!$table)

            return errorMsg("You must enter a table");

if (!$where)

            return errorMsg("You must enter a where condition");

$this->checkconnection();

mysql_query("DELETE FROM $table $where")

        or die ($this->classerror . mysql_error());

    }

/**************

    * Purpose: insert query

    * Precondition: table, values

    * Postcondition: row in table has been deleted

    **************/

    function insert($table, $fields, $values)

    {

        if (!$table)

            return errorMsg("You must enter a table");

if (!$values)

            return errorMsg("You must enter values in the table");

$this->checkconnection();

mysql_query("INSERT INTO $table ($fields) VALUES ($values)")

        or die ($this->classerror . mysql_error());

//id of the row just inserted

        return mysql_insert_id();

    }

 /**************

    * Purpose: find objects in the database then load them into an array

    * Precondition: field, table, and object

    * Postcondition: returns query data

    **************/

    function loadArray($field, $table, $where, $object)

    {

        $loop = mysql_query("SELECT $field FROM $table $where")

                or die ('cannot load object data from table $table: ' . mysql_error());

$customarray = array();

while ($row = mysql_fetch_array($loop))

            array_push($customarray, new $object($row[$field]));

return $customarray;

    }

/**************

    * Purpose: delete everything in a table

    * Precondition: table

    * Postcondition: all fields in table have been deleted

    **************/

    function truncate($table)

    {

        if (!$table)

            return errorMsg("You must enter a table");

$this->checkconnection();

mysql_query("TRUNCATE $table")

        or die ($this->classerror . mysql_error());

    }

} //end of class

/**************

* Purpose: show a formatted error message

**************/

function errorMsg($message)

{

 echo "<center>Error: $message.</center><br/>";

}


/**************

* Purpose: show a formatted success message

**************/

function successMsg($message)

{

 echo "<center>Success! $message.</center><br/>";

}

?>
I know everything’s not color coded but this is such a big class it’ll take me forever. So the short of it is we can use this class to do everything we need to do with our database. Take a look at this test file I made to see if the class was working. Try creating a table named attributes with an ID number and a name. Enter a few values into the table, then run this script:
<?phpinclude("mysqlobj.php");

//testing connection

echo "<b>Testing connection:</b> ";

$database = new database("localhost", "username_here", "password_here", "databasename_here");

echo "success!<br/>";

//testing query function

echo "<b>Testing query function:</b> ";

$loop = $database->query("SELECT * FROM attributes");

while ($row = mysql_fetch_assoc($loop))

{

 print_r($row);

 echo "<br/>";

}

echo "<br/><br/><b>Testing select function:</b> ";

//testing select function

$result = $database->select("name", "attributes", "WHERE id='3'");

echo $result['name'];

echo "<br/><br/><b>Testing update function:</b> ";

$database->update("attributes", "name='test field'", "WHERE id='12'");

$result = $database->select("name", "attributes", "WHERE id='12'");

echo $result['name'];

echo "<br/><br/><b>Changing Name Back:</b> ";

$database->update("attributes", "name='flexibility'", "WHERE id='12'");

$result = $database->select("name", "attributes", "WHERE id='12'");

echo $result['name'];

echo "<br/><br/><b>Testing Insert:</b> ";

$id = $database->insert("attributes", "name", "name='test'");

echo $id;

echo "<br/><br/><b>Testing Delete:</b> ";

$database->delete("attributes", "WHERE id='$id'");

echo "success!";

echo "<br/><br/><b>Testing disconnect:</b> ";

$database->disconnect();

echo "success!";

echo "<br/><br/><b>Testing Insert:</b> ";

$id = $database->insert("attributes", "name", "name='test2'");

echo $id;

echo "<br/><br/><b>Testing Insert:</b> ";

$id = $database->insert("attributes", "name", "name='test3'");

echo $id;

//testing query function

echo "<br/><br/><b>Listing all values in the database:</b> ";

$loop = $database->query("SELECT * FROM attributes");

while ($row = mysql_fetch_assoc($loop))

{

 print_r($row);

 echo "<br/>";

}

echo "<br/><br/><b>Testing Truncation:</b> ";

$id = $database->truncate("attributes");

echo $id;

//testing query function

echo "<br/><br/><b>Listing all values in the database:</b> ";

$loop = $database->query("SELECT * FROM attributes");

while ($row = mysql_fetch_assoc($loop))

{

 print_r($row);

 echo "<br/>";

}

echo "<br/><br/><b>Disconnecting:</b> ";

$database->disconnect();

echo "success!";

?>
What happens when you view this page? Can you see how it’s effecting things in the database? Great!! Now we’re ready to convert everything over to a database in our game.
Converting Everything Over
There is no cut and paste way to convert what we’ve done so far to use the database. My advice to you is to approach it however you most feel comfortable. Personally, the way I’d approach it would be to start with the map editor so once it’s converted over you’ll have maps in the database to fix the character page.
Once someone goes to save a map we need to:
- check to see if a map with that name already exists in the map table
- if the map already exists we want to load the existing values for that map
- if the map doesn’t exist we can show what we did before
- when someone clicks on the save button we need to
- update the map values in the database if it already exists OR
- add those new values to our mapdata table
- that’s it!
With our character page we only have to do one thing:
1. Change the loadMap function to load data from the database
Summary
There is a lot to digest in this lesson. Don’t worry if it all doesn’t make sense. Try making a database and playing around with it, add things, delete things and update things using SQL or the database class I provided above. Once you feel confident there try assigning database values into variables, make a small form to update values in the database. Then once you’re tired of that move on to converting the character.php and mapeditor.php files to use the database.
If you get stuck there’s nothing to worry about! All the working code is below. Enjoy.
Game Files
Working Version:
Character File: character.php
Map Editor: mapeditor.php
I’ve left it so you can actually add maps to the database so PLEASE RESPECT MY DATABASE!! Thank you 🙂
Source Files:
Character File: character.php
Map Editor: mapeditor.php
Database Tables: database.sql (map file data included)
Database Tables: database_empty.sql (no map data included)
Map File Database Importer: mapfile_importer.php
this will import the map files we made before right into your database!!
Mysql Database Class: mysqlobj.php
Functions: functions.php
Try it Yourself:
Lesson Reasoning
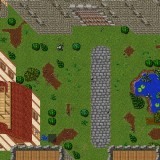
Now we’ve taken our simple 1-click button game and turned it into a decently functional database driven game!! Not only can we create maps with our map editor and store them directly into the database, we can move up and down levels in a map, use ladders, fall into pits, and make sure we don’t run into walls.
But our game is far from complete. In the next lesson we’ll discuss creating a member class and a character class and how they interact between each other. Then we’ll create a members table and a character table in our database. Finally we’ll write a login script so only members with a character can access our simple game map and play it.