Pits of Doom Lesson 8: Monsters & Field of View
In the last lesson we added a huge amount of functionality to our little game. Now we can join the game if we don’t already have an account, login and access only our account information, send for our login information if we forget it and logout of the game when we’re done playing. In this lesson we’ll explore some key concepts behind the game’s design pertaining to security and playability, as well as adding monsters and limiting the amount of the map we can see at any one time. I know in the last lessons I said I’d touch on fighting as well but it took me so long to get this lesson up that the next lesson will exclusively cover fighting and artificial intelligence (AI).
Lesson Concepts
Files, Folders & Directory Setup
Before we go much further I want to take a moment to talk about some added security features. Even though php is server side only I think it’s better to be safe than sorry when it comes to trying to keep data as secure as possible. Now in this game I won’t be encrypting passwords, but that is something I recommend if you’re going to store personal information about your players like phone numbers, addresses, and credit card information.
But that pretty much goes without saying. One thing that doesn’t is how to organize your files/folders and directories. My rule of thumb is, if it has a password attached to it, you don’t want it under your public web folder. So I usually setup all my games with this file structure:
/root
 --[folder] public_html
     -- [folder] images (CHMOD 777)
        -- I leave this 777 for player uploads (if allowed)
     --[folder] stylesheets
        -- stylesheet.css
        -- any other stylesheet folders
     --[folder] javascript
        -- ajax.js
        -- any other javascript folders
     -- index.php
     -- login.php
     -- join.php
     -- logout.php
     -- the rest of my web accessible files here
 --[folder] inc
    -- functions.php
    -- classfiles.php
    -- any other include files
 --[folder] oop
    -- memberobj.php
    -- mysqlobj.php
    -- characterobj.php
    -- any other object files
--dbconnect.php
All of my oop, include files, and database connection information is above the public_html directory. All the images, javascript and stylesheets are under the public_html folder along with the files I use for the game.
So what does this really mean? This ensures that if for some reason someone gets access to your web-accessible directory, all of your other code is safe and sound, including your database login information. Now if you look in the directory where all the source code is available for this game you’ll see I don’t follow that rule of thumb, but in the very last version of the full source game I will and I suggest you try organizing the rest of the files as we go along accordingly.
Class Includes Before Sessions
Another thing I want to mention is including all class files before any kind of session_start(). The way a session works is by sending header information to the server. In order for our session to then contain information about our classes it needs those definitions available before this header information is sent. It might not be a big thing to mention, but it is an important thing to note.
Also, I wanted to take a moment to discuss why I use objects for the game. It’s my experience that bandwidth is cheap. CPU power, on the other hand, is expensive. When you’re dealing with large games you want to cut down the number of queries you preform as much as possible. So, in our case, we load all the information we need once, when the member first logs in, and then only update it when they directly change something. This reduces the load on the SQL server and makes for better speeds during gameplay.
Slow Map Loading Times & MySQL Indexes
For those of you who’ve downloaded all the code and installed everything yourself (which I highly doubt but yeah, I’d love to give you the benefit) you might notice that it loads slowly if you have a large map. That’s okay, this is where the beauty of SQL comes into play. What we need to do is setup an index, think of it as a bookmark in a huge dictionary. It’s easier to find a bookmark than it is to flip through all the pages and narrow it down until you get the right word. Indexes help the database pull in results and values from the database much faster, however having too many indexes can be a bad thing as well.
Consider this, if you bookmark every page in the dictionary having a bookmark is pretty much useless. You still need to flip through all the bookmarks until you find the right one. Adding an indexes is easy:
mysql > ALTER TABLE mapdata ADD INDEX (value);

mysql > ALTER TABLE mapdata ADD INDEX (x, y, z);
What this does, in a nutshell, is tell mysql these are fields we’re going to be using a lot. After you’ve added these indexes to the mapdata table your game maps should load in under a second, versus the relatively slow loading time you were experiencing before.
When should you add an index? My rule of thumb is if you’re constantly looking for a field when you run a query, it should be a key or an index. I always setup a unique ID number as the key to my tables so no matter what I can quickly reference the row of data I’m looking for. Then I consider the types of queries I’ll be doing on that table. How often am I selecting just the x field in the mapdata table? Almost never. On the other hand, I’m looking for the x,y,z combination almost every time I query. Thus the x field alone isn’t an index, but x,y,z combined is a pretty good index.
Usability & Layout
Another thing you’ll notice is our layout isn’t really working for us as the maps get larger. When we have a large map the movement buttons are out of view and you have to scroll down to press them every time, what a pain! Usability is something you should take into consideration as you develop your game. If it’s more of a hassle to push a main button in order to play the game, who will want to play it? Also, we should take into consideration each member will only actively be using one character at a time, even though they’ll have multiple characters active once they login.
Here’s our old layout:

And in this version, our new layout:

You can instantly see a big difference in usability. In this new layout we’ll present the user with a smaller view of the map at all times, but give them more options to choose from on the page. With this layout they can move their character, see their character’s statistics, access more menu options, and chat with other members all at the same time.
Another thing I’ll be doing is using CSS (cascading style sheets) when I design the new layout. That way I can easily change the colors/fonts and spacing of the entire site after it’s complete by changing one file instead of every file. For more information on CSS I highly recommend the WC3 website and the W3School website. Then of course there’s my favorite CSS site if you need a bit of inspiration: CSS Zen Garden.
Map & Coordinate Classes
The current functions we have for our map are great, they’re easy to use and we can call them from anywhere. Not only will these be useful as we further develop our game, they will probably come in handy in a few rare cases. But they should be supplemental, not the big picture.
What we need to do now is create a map class and a coordinate class. The map class constructor will take the ID of a map and the level of a map. Then it will load all the coordinates for that map level.
A coordinate will hold information on the x,y,z position in the map, the value of that position, as well as monster data, item data, and so forth and so on.
Finally, we’ll modify our displayMap so all it needs is a member object in order to display the map for their current character.
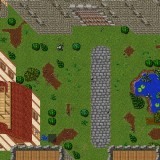
Field of View
In order to make our game more authentic, and to reduce how often we’re query the database, we’re going to introduce FOV, or field of view, and level restrictions. Just like a real person, we’re going to limit how many characters/monsters the active character can see around them. We can even make something fancy later on where certain character types are more perceptive than others.
In order for this logic to work on our game, let’s see how a real FOV works. Sorry for the lame drawings but you get the idea!


The first picture shows someone looking out into the distance. The second picture shows someone facing right. In each of these the field of view is shaped like a triangle. If we super-imposed this concept on our map we’d get something like this:

The X is the location of the character and the O’s indicate spaces they’d be able to see a monster. We could certainly implement this kind of FOV in the game, however this would bring up a need to keep track of the direction the character is facing. Because our character’s don’t really have a direction we’re going to fudge this a little bit and use the spotlight approach. Now our game FOV looks more like this:

This character has a 360 one-degree view of the other characters/monsters around them. Using pictures is a great way to visualize how things will work and I highly recommend doing it as often and reasonably as possible. Now we can see which locations on the map we’ll need to check while someone is playing as a character. More perceptive characters (human, elf, fairy, whatever) could have varying degrees of depth. For instance, an elf might be able to see three spaces out in any direction while a human can only see one.
Monster Generation
To keep things simple (since fighting is rather complex) we’re going to write a script that automatically generates monsters with fairly random statistics and places them around the game map at different levels. We’ll come back later and add in logical monster generation and give them some movement so they’re not always stationary on the map. Then we’ll add a touch of AI (artificial intelligence) so they have a reason to want to hunt you down and kill you (yay!) or run away when they’re low on health (die die!).
In our case, a monster is really just a character that doesn’t belong to anyone. It has all of the same statistics and fields as our character class. So, what we’re going to do is make our monster class an extension of our character class. That way we won’t have to re-define everything. We’ll also be adding a few new parameters that are optional, meaning we can create the monster without passing those values if we choose.
We should also create a script that will automatically create monsters for us. Think of it this way, if you have 100 people running around fighting the monsters in our game then eventually all the monsters will die off. What we need is a fool proof way to make sure there are always enough bad guys to hack into pieces.
Extending Classes
I think of an extended class as a shortcut to programming similar objects. Other people, and your traditional programming school books, will tell you it’s a class that extends the functionality of an existing class. It may also be referred to as a sub-class.
In our game we’re going to extend our character class to make a monster class. The reasons for this is that a monster has all the same variables and information as a character, with a few new things thrown into the mix.
Programatically an extended class is easy to create. Take this example:
class car {
  var $make;
  var $model;
  var $shift_auto;
  var $horsepower;
  var $color;
  var $fuel;
  var $mpg;

  function drive($distance)
  {
     if ($fuel - $distance > 0)
     {
       $fuel -= $distance;
       echo "Driving $distance miles";
     }
     else
       echo "You don't have enough gas to go that far.";
  }

  function refuel($amount)
  {
    $fuel += $amount;
  }

}
Our car class gives us some information about the car and the ability to drive and refuel. Now look at this extended class:
class truck extends car { var $tow_capacity; var $has_hitch;

  function tow_vehicle($car_object)
  {
     return "Towing a " . $car_object->make . " " . $car_object->model;
  }
}
In our extended class, we automatically have all the functions and variables from the car class, but we’ve also added the ability to tow another vehicle. Try making another extended class called sportscars. What additional variables or functions do you think you’d add?
This same idea has been applied to our monsters class. We want all the properties of a character (after all, a character can also be a monster) but we want functions that are specific only to monsters.
Default & Optional Parameter Values
One of the neatest things about PHP is the ability to have an optional function parameter. Take a look at this example:
function fruit($type, $color = "red", size = null)
{
  if (!$size)
  {
    switch(rand(1, 3)) {
    case 1: $size = "small";
     break;
    case 2: $size = "medium";
     break;
    case 3: $size = "large";
     break;
  }

  echo "$size $color $type<br/>";
}
Maybe you can figure out how this function works all on your own! All of the examples below are acceptable ways to call this function:
fruit(“cherry”) — returns {size} red cherry where size is randomly selected.
fruit (“bananna”, “yellow”) — returns {size} yellow bannana where size is randomly selected.
fruit(“plumb”, “purple”, “small”) — returns small purple plum.
This fruit function now special properties. It has two optional parameters, one default parameter and one required parameter. The type of fruit is required. The color of the fruit is optional, but if you don’t specify a color it will automatically default to red. The size of the fruit is also optional, but if you don’t give it a size then the function will randomly pick one.
What makes these parameters optional? We’ve assigned them to a value right in the function declaration. However this doesn’t prevent us from changing the value by passing in our own.
Utilities
You may have noticed by now that we have several neat scripts we’ve written to help ourselves out as we’ve been designing things. These are called utilities. A utility is a collection of scripts that help clean, maintain or break down larger jobs into smaller, easier processes.
We have one utility already, our map editor, and we’re going to add two new ones. One is our monster generator, and the other is a view file source ability. I like to keep all of these scripts in a folder by themselves. Then, once our game is done, we’ll have a really solid base of utility scripts to use when we go to create our admin panel. Ha! I bet you totally forgot about that one but perhaps you can see where I’m going with this now.
Summary
Try the working version! In this lesson we changed the layout of the game by taking into consideration some of the problems we’re faced with the prototype design we had before. We created two new classes, updated a few functions and wrote a script to automatically generate monsters and locate them at random places around the map. We took into consideration FOV and how to use it to reduce our query requests as much as possible.
Game Files
Working Version:
Pits of Doom, use the login below or sign up and create your own account to test the working version of this game!
Login: test
Password: test
Source Files:
Download the .zip archive for this lesson. There are so many files now it’s a pain to list them all separately here like I have in the other lessons. Or you can use our new view source utility for a full breakdown of all files and their php code.
Lesson Reasoning
This lesson builds upon what we did in the one before by enhancing usability, increasing database speeds with indexes, adding monsters and then two new utilities. In the next lesson we’ll enhance the map with pictures and a sprite library, give monsters the ability to move around and implement simple AI so they can follow you around and attack.


That’s some good stuff right there, always looking forward to the next one 🙂
It makes me really happy to actually see a PHP tutorial on how to create a Game. 🙂
I’m glad you like it. I’m working on the next lesson so hopefully you’ll read that one as well 🙂
Hi Jade,
That is an excellent tutorial, and I’d love to see the next lesson(s)!
Many thanks for all your hard work putting these tuts online.
– Aug